Home ﹥ Custom Page > How To & Reasons Why? > How to use Directivity Color Calibration Filter
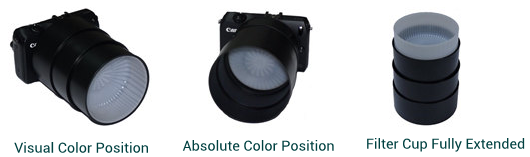
It would be closer to the Absolute Color of the object if the center part of the Filter receives less illumination quantity from the main light source; it would be closer to ambient color tone if the center part of the Filter receives more illumination quantity from the main light source.
For examples, by fully extending the Filter cup out of the barrel to allow the cup well exposed to the main lighting that would achieve colder tone color temperature in the morning while warmer tone in the evening. Thus, you could easily manipulate the color tone to your preference between the Absolute Color and Visual Color by adjusting the Filter position in the barrel.
Custom White Balance for Canon Camera:
Perform this procedure with the shoot mode of
P.A.S.M. under the actual light source:
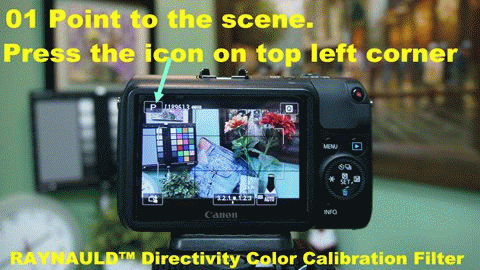
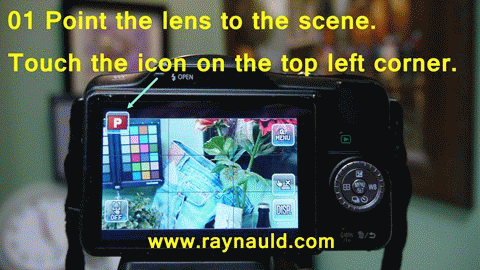
1.Point the lens to the shoot scene
with setup manual or automatic
focus being set.
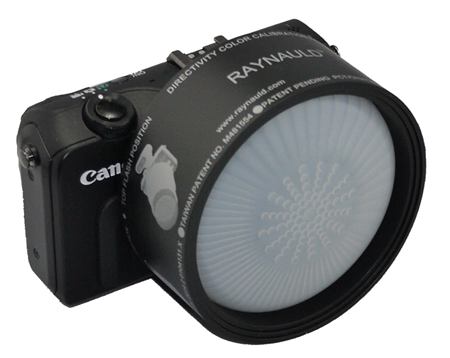
Cover the front lens with “Raynauld Directivity Color
Calibration Filter”
and snap for a photo. After that, the barrel filter
can be removed
from the lens.
2. Select [Custom White Balance]
and press
3. Import the White Balance
Data.
。Select the
image that was captured in the step 1, then press .
。On the dialog
screen that appears, select [OK] and the data will
be
imported.
。When the menu
reappears, press the button to exit the menu.
4.Press to display the Quick
Control screen.
5.Select the Custom White Balance,
then press. Then, start shooting
or taking
video.
Custom White Balance for
Panasonic Camera:
Perform this procedure with the recording mode
of P.A.S.M. under the actual light source:
1.Press the right button on
[MENU/SET], then select White Set 1.
2.Press the UP button to display
the small window.
3.Point the lens towards the shoot
scenery, then cover the front lens
with Raynauld
Directivity Color Calibration filter.
4.Press the [MENU/SET] to complete
the setting. Remove the filter to
shoot a photo or take
a video.
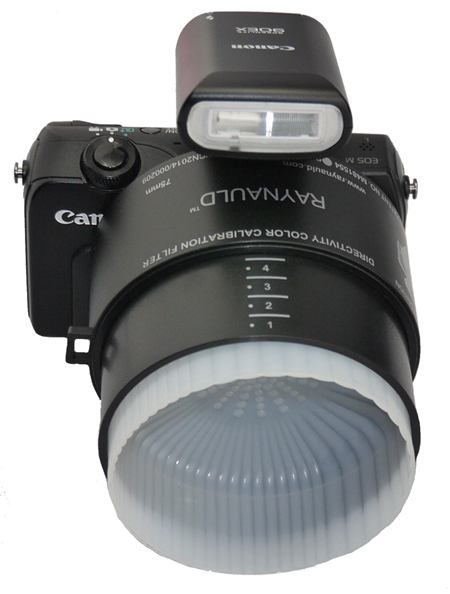
5 Basic Setting Positions for DCC Filter to
use with camera:
A For indoor
B For outdoor - short range,
portrait, street view
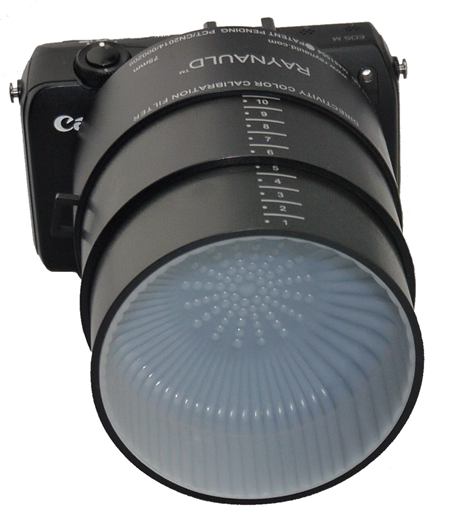
C Outdoor – Middle to long distant
photograph & Indoor
Portrait

D Top Flash for manual white
balance setting
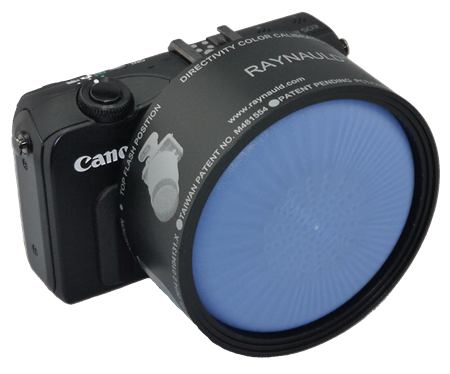
 E Using the blue filter
cup in the yellow indoor lighting to maintain the warm
tone.
E Using the blue filter
cup in the yellow indoor lighting to maintain the warm
tone.
Users’
attentions:
* The methods and steps to do the
Manual White Balance (White Set, Custom White Balance, etc.) of
each camera brand are different. Please refer to the camera manual for the
correct operation. The option of “Manual White Balance” might only
be available when the shoot mode is set in P, A, S or
M.
* When using the remote flash or
indoor photography lighting system, please follow the same
above-mentioned steps while turning the flash light on and the
required light system to perform the custom white balance with the
filter.
* Set the photo style to NATURAL
(NEUTUAL) with variety of (0,0,0,0)! The sharpness can be
slightly increased. Based on the actual photo on monitor, the
brightness might need to be adjusted if necessary for the best
result. However, there might exist color cast to blue, red or green
after the color calibration adjust using the filter, there might
need to adjust the camera color system to correct its problems in
order to shot for environmental color photos. For instance,
Olympus E-PL1 has to set -3 in order to eliminate its reddish
phenomenon of its photo.
* If encounter the unusual excess
resistance while stretching out or drawing back the DCC Filter
body, please twist the body a little bit to solve the
problem.
* For those professional
photographers who always mount the lens hood on lens or would
rather not to take off the lens hood from the lens, please select
the outer diameter of DCC Filter is smaller than the minimum inner
diameter of lens hood so that the DCC Filter could be inserted into
the lens hood for proper works. Or, you might choose a larger DCC
Filter to cover the lens hood to work properly.
* Whenever photography scene or
character display contents are changed, the average value of the
color temperature of the framed scene would be varied. Be sure to
redo the above-mentioned manual white balance to get the best color
accuracy.
* When in use, only need to cover
the front end of lens with Color Calibration Balance Filter to
conduct the “Manual White Balance”. There is no need to cover the
whole lens body with the black sleeve of the filter.
* Please avoid using the over-sized
filter as it would degrade the color measurement performance in
accuracy.
* The color calibrating function of
the Filter is limited by the color system of the camera itself. It
can not be expected to override the camera build-in system, such as
shooting under extremely low light and low color temperature scenes
(such as candle lights) or the color cast design of the camera
etc.
* At a special photographic
environment with a single color, please use a gray card or put
additional staff on site to perform the white balance
adjustment. It also helps to do the color calibrating by
putting extra movable staff, such as chairs, cloths or body, in the
scene.
* The colors from the “Visual
Color” and “Absolute Color” positions are different from each
other. Please choose and adjust based on your needs.
* Keep the Filter clean and away from any
grease that could color the filter and damage its color
calibrating accuracy! Clean with soft and dirty free
towel.
* None of the current camera is
equipped with the color temperature auto adjusting screen. Thus,
please do not use the camera screen to do the photo on site
calibrating purpose.
★ PCT NO. PCT/CN2014/000209
★ CHINA PATENT NO. ZL 2014 2 0104131.X
★ TAIWAN PATENT NO. M481554